
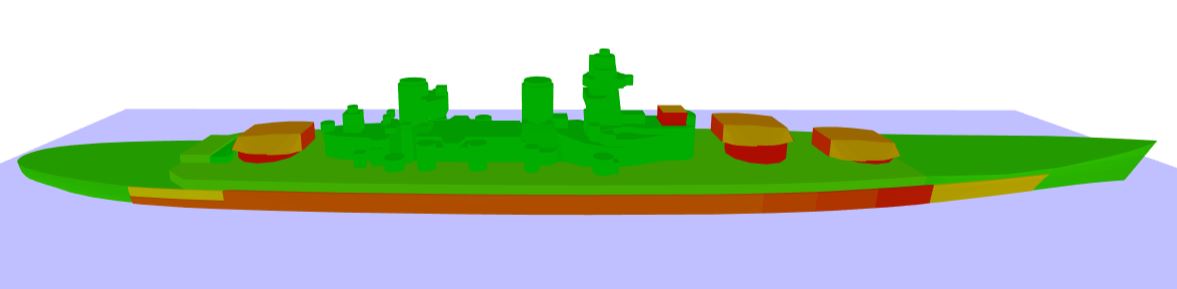
Supertest: Russian Tier IX battleship Sovetsky Soyuz
8 min readAlright, after a big delay (and I am truly sorry for it, personal life was keeping me busy) we can finally have a look at the 3 last Russian battleships! Let’s go with Sovetsky Soyuz!
The Sovetsky Soyuz might be with the Gangut and MAYBE the Kreml/Kremlin the most well-known ships in that tech tree as it was one of the closest to be completed. The Project 23 of battleships was started by the USSR in the late 1930s. Designed to counter German battleships, they would have reached a size similar to the Yamato once completed.
A total of 4 ships were laid down by 1940: the Sovetsky Soyuz, the Sovetskaya Ukraina, the Sovetskaya Rossiya and the Sovetskaya Belorussiya. Sadly, as it was the first time that Russian shipyards and industries had to deal with ships of such scale, multiple difficulties appeared. The Sovetskaya Belorussiya was even canceled after discovering multiple construction flaws.
Soon after, a group of angry Germans talking about a certain operation Barbarossa came knocking at the door of Mother Russia and all work on the ships were suspended. The remaining 3 ships will later be scrapped in the late 1940s.

Here is a picture taken by the Luftwaffe in June 1941 of the Sovetsky Soyuz as she was when the construction was suspended.
Hull | Engine | Gun Fire Control System | Main battery |
S. Soyuz (A) |
Propulsion: 231 000 hp |
GFCS IX mod. 1 |
406 mm/50 MK-1 |
S. Soyuz (B) |
GFCS IX mod. 2 |


| Tier | IX |
| Health | 80 900 HP |
| Main Armament | |
| Maximum Firing Range | 17 620 km |
| 406 mm/50 MK-1 | 3 x 3 406 mm |
| Secondary Armament | |
| Maximum Firing Range | 5.00 km |
| 152 mm/57 MK-17 | 6 x 2 152 mm |
| 100 mm/56 MZ-14 | 4 x 2 100 mm |
| Maximum speed | 28 kt |
| Turning Circle Radius | 950 m |
| Rudder Shift Time | 20.9 s |
| Surface Detectability | 16.70 km |
| Air Detectability | 13.36 km |
| Detectability After Firing Main Gus in Smoke | 16.10 km |
| 3×3 406 mm/50 MK-1 | |
| 180 Degree Turn Time | 30.0 s |
| Reloading Time | 33.0 s |
| Optimal front firing angle | 30° |
| Optimal rear firing angle | 30° |
| Sigma | 1.70 sigma |
| Maximum Dispersion | 257 m |
| Shells | |
| Type of Projectile | HE |
| Alpha Damage | 5 800 HP |
| Damage | 5 020 HP |
| Alpha Piercing HE | 68 mm |
| Explosion Size | 2.53 |
| Chance to Cause Fire | 40 % |
| Projectile Speed | 830 m/s |
| Air Drag | 0.304 |
| Projectile Mass | 1 108 |
| Projectile Krupp | 250 |
| Type of Projectile | AP |
| Alpha Damage | 13 250 HP |
| Chance to Cause Fire | -0.5 % |
| Projectile Speed | 830 m/s |
| Air Drag | 0.247 |
| Projectile Mass | 1 108 |
| Projectile Krupp | 2 430 |
| Projectile Detonator | 0.033 s |
| 6 x 2 100 mm/56 MZ-14 | |
| Reloading Time | 3.75 s |
| Sigma | 1.00 sigma |
| Horizontal Dispersion | 50 m |
| Vertical Dispersion | 110 m |
| Shells | |
| Type of Projectile | HE |
| Alpha Damage | 1 400 HP |
| Damage | 310 HP |
| Alpha Piercing HE | 17 mm |
| Explosion Size | 0.29 |
| Chance to Cause Fire | 6 % |
| Projectile Speed | 895 m/s |
| Air Drag | 0.286 |
| Projectile Mass | 15.8 |
| Projectile Krupp | 1 |
| 6 x 2 152 mm/57 MK-17 | |
| Reloading Time | 8.0 s |
| Sigma | 1.00 sigma |
| Horizontal Dispersion | 50 m |
| Vertical Dispersion | 110 m |
| Shells | |
| Type of Projectile | HE |
| Alpha Damage | 2 200 HP |
| Damage | 810 HP |
| Alpha Piercing HE | 25 mm |
| Explosion Size | 0.58 |
| Chance to Cause Fire | 12 % |
| Projectile Speed | 950 m/s |
| Air Drag | 0.321 |
| Projectile Mass | 55 |
| Projectile Krupp | 6 |
| 4 x 2 100 mm/56 MZ-14 | |
| Sector range | 3.2 km – 5.8 km |
| Hit chance | 73 % |
| Sector’s damage | 310 |
| Sector’s damage frequency | 3.38 s |
| Sector’s damage per second | 92 |
| Flak clouds number | 4 |
| Flak cloud damage | 1400 |
| 8 x 1 37 mm 70-K and 8 x 4 37 mm 46-KR | |
| Sector range | 1.0 km – 3.2 km |
| Hit chance | 73 % |
| Sector’s damage | 190 |
| Sector’s damage frequency | 0.69 s |
| Sector’s damage per second | 275 |
| Flak clouds number | 7 |
| Flak cloud damage | 840 |
| Sector reinforcement | |
| Sector reinforcement bonus | +25% |
| Sector reinforcement time | 12 s |
| Sector reinforcement shift time | 12 s |
Slot 1 | Slot 2 | Slot 3 |
 Consumable charges: 3 Work time: 10 s Cooldown: 60 s |  Consumable charges: 2 Work time: 28 s Cooldown: 120 s HP regeneration speed: 0.005 % HP/s |  Consumable charges: 2 Work time: 60 s Cooldown: 135 s Radius: 3 km |
 Consumable charges: 4 Work time: 10 s Cooldown: 40 s |  Consumable charges: 3 Work time: 28 s Cooldown: 80 s HP regeneration speed: 0.005 % HP/s |  Consumable charges: 3 Work time: 60 s Cooldown: 90 s Radius: 3 km |
 Charges: 2 Work time: 50 s Cooldown: 270 s Spotting range: 15 km Will only spot battleships and aircraft carriers | ||
 Charges: 3 Work time: 50 s Cooldown: 180 s Range: 15 km Will only spot battleships and aircraft carriers |
| Tier | IX |
| Health | 88 100 HP |
| Main Armament | |
| Maximum Firing Range | 19 382 km |
| 406 mm/50 MK-1 | 3 x 3 406 mm |
| Secondary Armament | |
| Maximum Firing Range | 5.00 km |
| 130 mm/55 B-2-U | 6 x 2 130 mm |
| Maximum speed | 28 kt |
| Turning Circle Radius | 950 m |
| Rudder Shift Time | 14.9 s |
| Surface Detectability | 16.70 km |
| Air Detectability | 13.36 km |
| Detectability After Firing Main Gus in Smoke | 16.10 km |
| 3×3 406 mm/50 MK-1 | |
| 180 Degree Turn Time | 30.0 s |
| Reloading Time | 33.0 s |
| Optimal front firing angle | 30° |
| Optimal rear firing angle | 30° |
| Sigma | 1.70 sigma |
| Maximum Dispersion | 257 m |
| Shells | |
| Type of Projectile | HE |
| Alpha Damage | 5 800 HP |
| Damage | 5 020 HP |
| Alpha Piercing HE | 68 mm |
| Explosion Size | 2.53 |
| Chance to Cause Fire | 40 % |
| Projectile Speed | 830 m/s |
| Air Drag | 0.304 |
| Projectile Mass | 1 108 |
| Projectile Krupp | 250 |
| Type of Projectile | AP |
| Alpha Damage | 13 250 HP |
| Chance to Cause Fire | -0.5 % |
| Projectile Speed | 830 m/s |
| Air Drag | 0.247 |
| Projectile Mass | 1 108 |
| Projectile Krupp | 2 430 |
| Projectile Detonator | 0.033 s |
| 6 x 2 130 mm/55 B-2-U | |
| Reloading Time | 5.0 s |
| Sigma | 1.00 sigma |
| Horizontal Dispersion | 50 m |
| Vertical Dispersion | 110 m |
| Shells | |
| Type of Projectile | HE |
| Alpha Damage | 1 900 HP |
| Damage | 570 HP |
| Alpha Piercing HE | 22 mm |
| Explosion Size | 0.45 |
| Chance to Cause Fire | 8 % |
| Projectile Speed | 900 m/s |
| Air Drag | 0.255 |
| Projectile Mass | 33.4 |
| Projectile Krupp | 52 |
| 6 x 2 130 mm/55 B-2-U | |
| Sector range | 3.5 km – 6.0 km |
| Hit chance | 73 % |
| Sector’s damage | 450 |
| Sector’s damage frequency | 3.43 s |
| Sector’s damage per second | 131 |
| Flak clouds number | 5 |
| Flak cloud damage | 1540 |
| 12 x 4 37 mm 46-KR and 8 x 2 37 mm V-11 | |
| Sector range | 2.3 km – 3.5 km |
| Hit chance | 73 % |
| Sector’s damage | 200 |
| Sector’s damage frequency | 0.46 s |
| Sector’s damage per second | 435 |
| Flak clouds number | 10 |
| Flak cloud damage | 910 |
| 4 x 4 25 mm 4M-120 | |
| Sector range | 0.1 km – 2.3 km |
| Hit chance | 68 % |
| Sector’s damage | 150 |
| Sector’s damage frequency | 0.71s |
| Sector’s damage per second | 211 |
| Sector reinforcement | |
| Sector reinforcement bonus | +25% |
| Sector reinforcement time | 12 s |
| Sector reinforcement shift time | 12 s |
Slot 1 | Slot 2 | Slot 3 |
Consumable charges: 3 Work time: 10 s Cooldown: 60 s | Consumable charges: 2 Work time: 28 s Cooldown: 120 s HP regeneration speed: 0.005 % HP/s | Consumable charges: 2 Work time: 60 s Cooldown: 135 s Radius: 3 km |
Consumable charges: 4 Work time: 10 s Cooldown: 40 s | Consumable charges: 3 Work time: 28 s Cooldown: 80 s HP regeneration speed: 0.005 % HP/s | Consumable charges: 3 Work time: 60 s Cooldown: 90 s Radius: 3 km |
Charges: 2 Work time: 50 s Cooldown: 270 s Spotting range: 15 km Will only spot battleships and aircraft carriers | ||
Charges: 3 Work time: 50 s Cooldown: 180 s Range: 15 km Will only spot battleships and aircraft carriers |
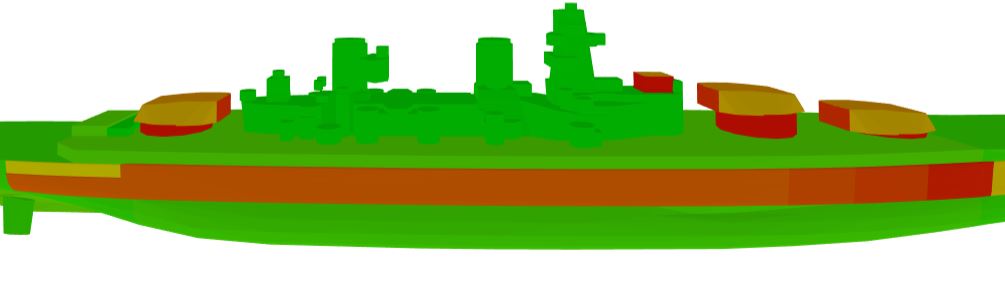
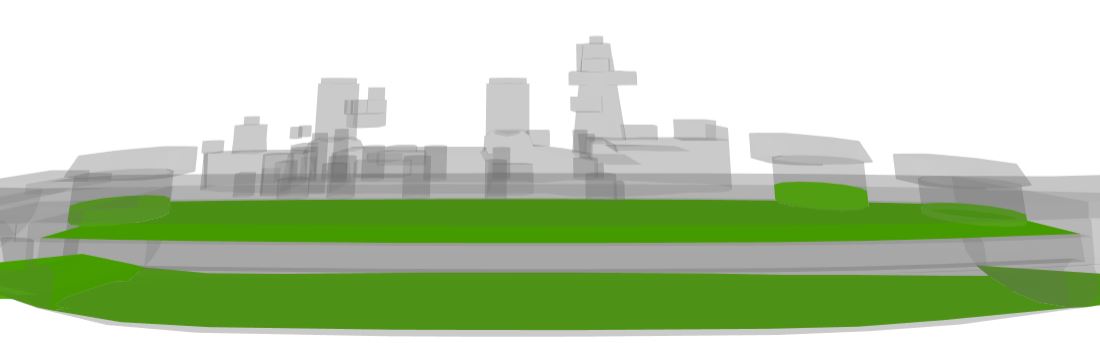
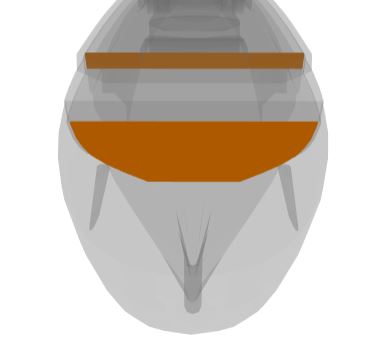
The armor analysis
The Sovetsky Soyuz is quite an interesting ship in terms of armor. Unlike the Vladivostok and the Kremlin that both have an exposed upper citadel, Sovetsky Soyuz actually has a full spaced armor scheme protecting her citadel.
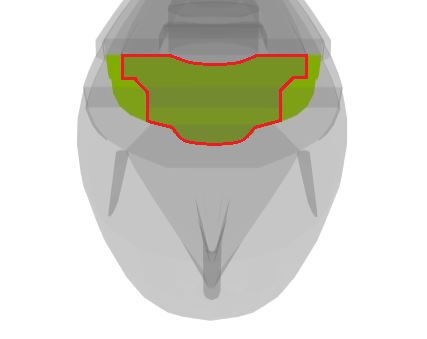
The bow section
This time, we won’t have a bow the size of Russia. It is much more… let’s say standard.
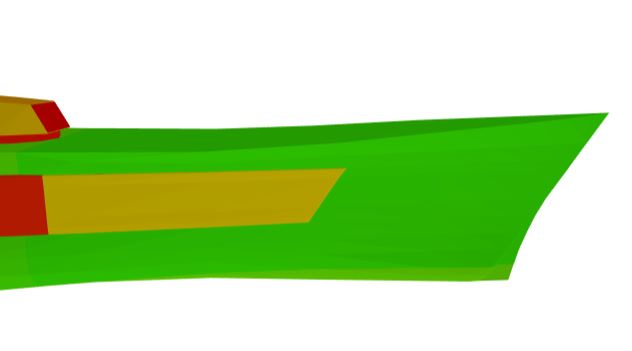
The plating is the classic tier IX protection with 32 mm except for the extended belt of 220 mm.
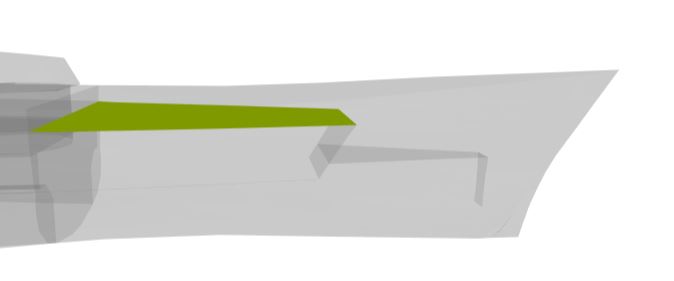
Inside the bow, there are 2 armored decks but with a quite weird layout as you can see here. The first armored deck is 100 mm thick and reaches the main armor deck.
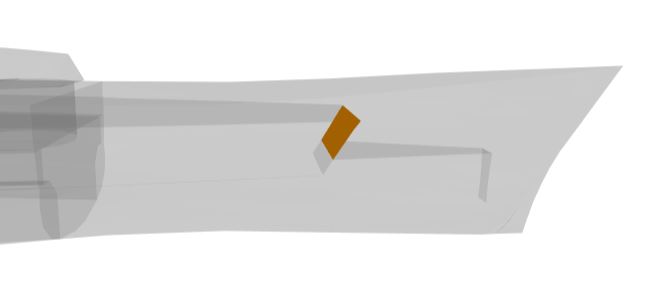

Between the 2 armored decks, there is a bulkhead with the upper part being 285 mm thick and the lower part 250 mm thick.
The second armored deck is exactly at the waterline and is followed by a second bulkhead. Both are 65 mm thick.
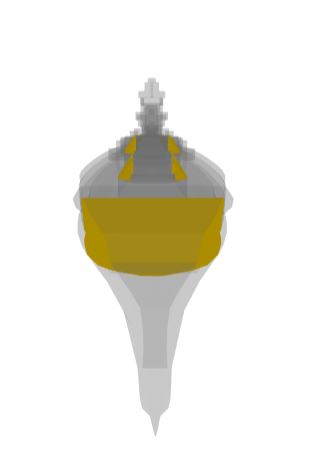
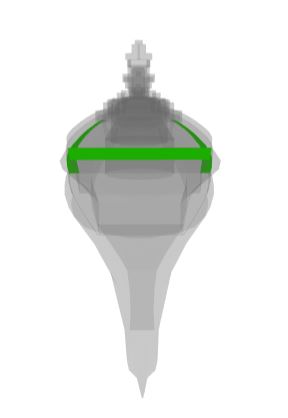
As for the frontal protection of the middle section, the lower part (on the left) including the citadel is 230 mm thick. The upper part (on the right) is only 25 mm thick.
As for the citadel, there is how the athwartship looks like. We once again have that T shaped citadel so if you want to hit it, aim above the water line and not below as it will be much easier to reach even with the spaced armor.
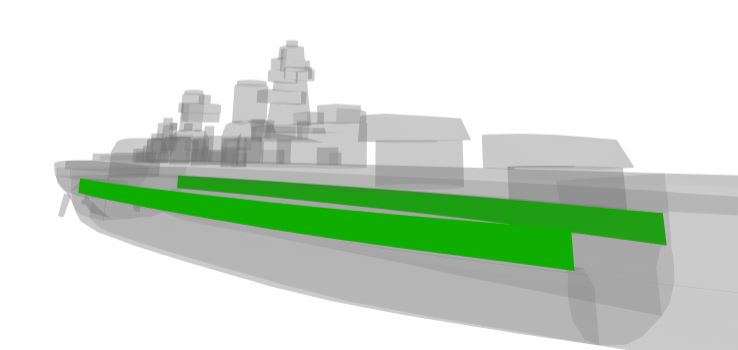
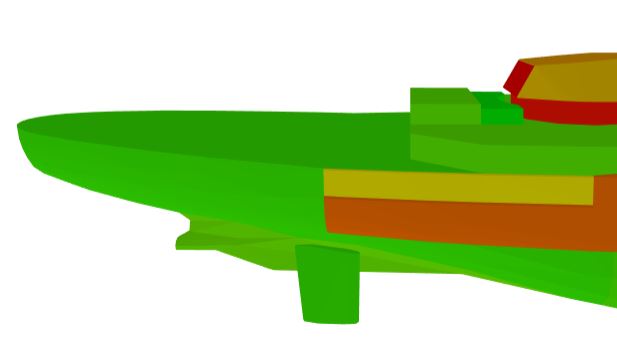
The middle section
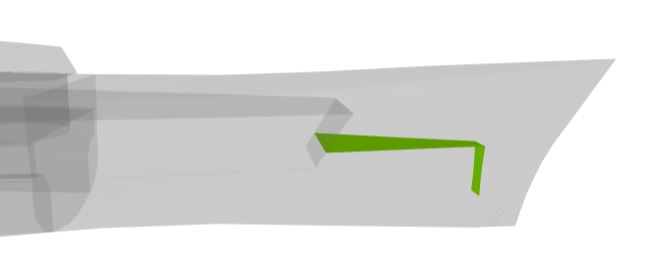
For the middle section, we have an extra thick main belt. Or at least, a part of it. Starting from the front (in red) the main belt is 420 mm thick but then it gets thinner to 406 mm, then 390 mm and finally 375 mm for the rest of the main belt (between the 2nd and 3rd turret). I think that you understood it well, if you want to penetrate the main belt of that ship, avoid shooting the part below the 1st turret.
As for the upper belt and the deck, they are 40 mm thick which is pretty nice against cruisers HE and Yamato guns.
Once we cracked the shell, we can look at the citadel inside of it. The upper part (on the left) is only 20 mm thick and is fairly close from the main belt. This means that if a shell punches through your main belt, the shells will most likely hit the citadel as well. The lower part that gets deeper inside the ship and below the waterline is 58 mm thick. Basically, forget that part of the citadel, you won’t reach it.
For the armor decks, there is first a 150 mm main armor deck and then the citadel’s 50 mm deck. It MIGHT save you from AP bombs but I can’t be 100 % sure at all with the new AP bombs mechanics.
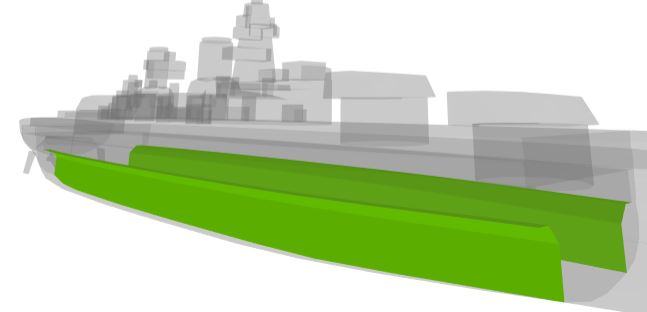
The stern section
For the stern, we have the classic 32 mm of armor plus an extended belt of 375 mm for the lower part and the upper part is 180 mm thick.
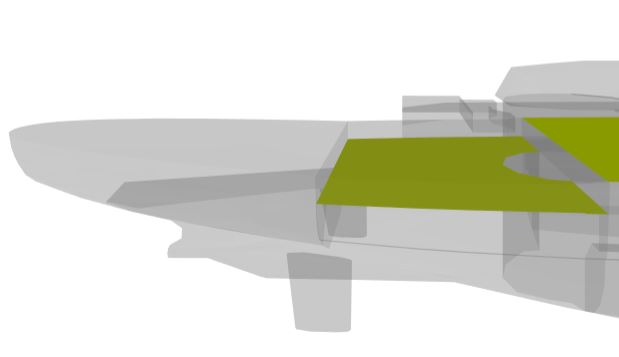
For the first part of the internal protection, there is a 100 mm thick armored deck and just above it, at the end of the extended belt of 180 mm, a casemate also 180 mm thick.

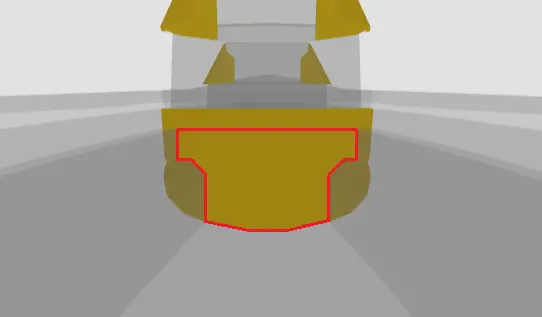
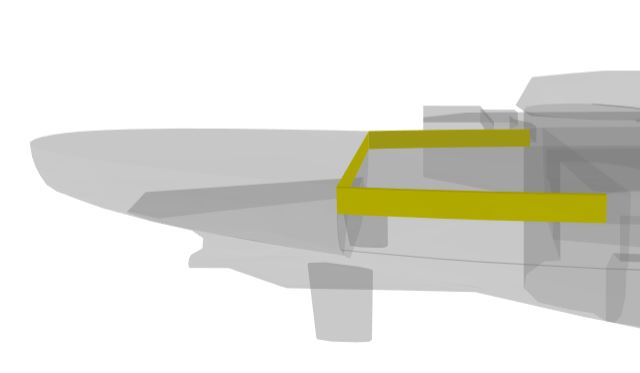
For the second part, there is an armored deck right at the waterline with sloped sides. It is 65 mm thick. Right after, there is one massive bulkhead of 365 mm below the 180 mm casemate I talked about just before. As you can see, the upper part of the middle section’s rear protection is also 365 mm thick.
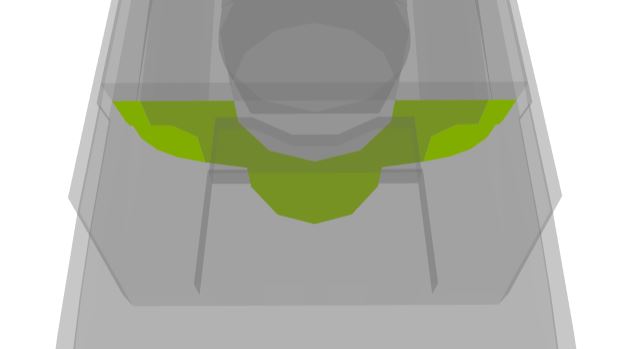
Finally, for the citadel’s athwartship and the casemate around it, they are both 75 mm thick and as you can see, it is actually shaped around what would normally be the barbette of the third turret.
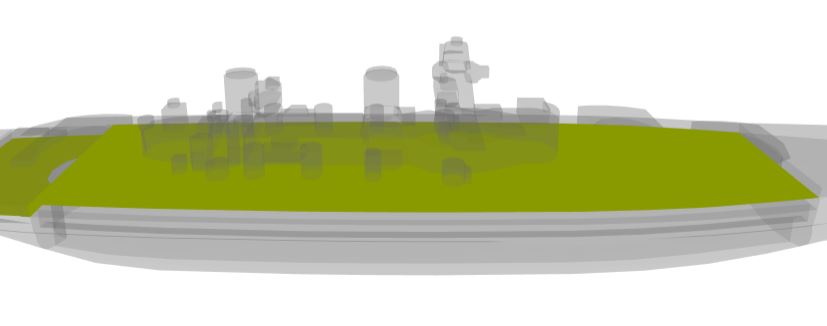
The superstructure
The superstructure is the classic 19 mm thick. Compared to previous ships, it is relatively larger so destroyers will have a bit more stuff to damage.
The turrets
Well, these turrets are really not bad in terms of armor protection. The face is 495 mm thick, the sides are 230 mm thick, the back is 410 mm thick and finally, the roof is 270 mm thick. As for the barbette, the upper part is 425 mm thick and the much smaller lower part is 50 mm thick.
Unlike the previous ship where the turrets seemed relatively “”fragile””, these turrets will be a tough nut to crack.
As of right now, this ship looks quite strong. The gun handling seems amazing, the shells hit like a truck and the armor is really good. Promising, promising.


Here she is… my FAVOURITE battleship, who I have been waiting for since 2015. Oh it will be so good to finally see her in game!
i think it’s more like Khronshtadt but bigger
Am I the only one who sees a certain similarity with the Roma? The turrets are similar, the main deck is lower at the stern on both ships… It looks a bit like a Roma on steroids, don’t you think?