
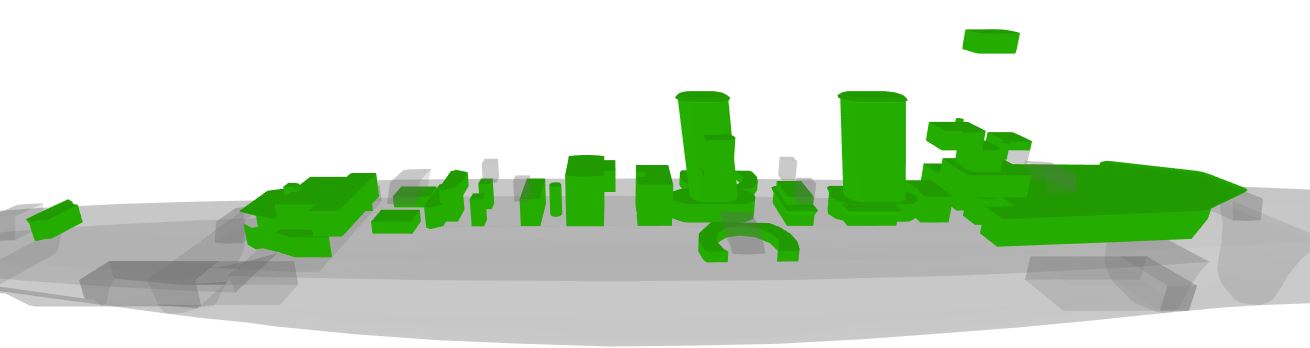
Supertest: British Tier V Cruiser Hawkins
7 min readThe Royal Navy Heavy Cruiser line that is now under development will start at tier V and by such, after the Danae, you will have the choice between the Emerald and the Hawkins. I just hope that the second choice will be less painful to play than the first one…
Historically speaking, HMS Hawkins was the lead ship of the Hawkins-class of heavy cruisers from the Royal Navy. The ship was launched in October 1917 and commissioned in July 1919.
During the inter-war period wasn’t really fascinating. She was decommissioned and then recommissioned 2 times to finally be sent to reserve in 1935. Due to the London Naval Treaty in 1937, the ship was demilitarized and turned into a Cadets’ training ship.
When World War II broke out, she was rearmed and recommissioned. She had a very active service, serving both in the Atlantic and the Indian Ocean. Her last Operation was Operation Neptune during which she provided support during the landing on Utah Beach.
She was finally be sent to reserve in 1945 and, after serving as a target ship will be scrapped in 1947.

Hull | Engine | Gun Fire Control System | Main battery | Torpedoes |
Hawkins (A) |
Propulsion: 60 000 hp |
Mk V mod. 1 |
190 mm/45 BL Mk VI |
533 mm Mk VII |
Hawkins (B) |
Mk V mod. 2 |


Stock ship
| Tier | V |
| Health | 27 800 HP |
| Main Armament | |
| Maximum Firing Range | 12.650 km |
| 190 mm/45 BL Mk VI | 7 x 1 190 mm |
| Secondary Armament | |
| Maximum Firing Range | 4.500 km |
| 102 mm/45 Mk V | 4 x 1 102 mm |
| Torpedo Armament | |
| Maximum Firing Range | 7.000 km |
| 533 mm DR Mk II | 2 x 2 533 mm |
| Maximum speed | 30 kt |
| Turning Circle Radius | 640 m |
| Rudder Shift Time | 12.8 s |
| Surface Detectability | 12.6 km |
| Air Detectability | 6.36 km |
| Detectability After Firing Main Gus in Smoke | 6.91 km |
| 7 x 1 190 mm/45 BL Mk VI | |
| Reloading Time | 13 s |
| 180 Degree Turn Time | 18.0 s |
| Optimal firing angles at the front | 30° for 4 guns 45° for 5 guns 64° for 6 guns |
| Optimal firing angles at the rear | 20° for 4 guns 52° for 6 guns |
| Sigma | 2.00 sigma |
| Maximum Dispersion | 117 m |
| Shells | |
| Type of Projectile | HE – 190 mm HE 200 fn. |
| Alpha Damage | 2 650 HP |
| Damage | 1 030 HP |
| Penetration capacity | 33 mm |
| Explosion size | 0.77 |
| Fire chance | 13 % |
| Projectile Speed | 844 m/s |
| Air Drag | 0.445 |
| Projectile Mass | 90.7 |
| Type of Projectile | AP – 190 mm AP 200 fn. |
| Alpha Damage | 4 050 HP |
| Chance to Cause Fire | -0.5 % |
| Projectile Speed | 844 m/s |
| Air Drag | 0.445 |
| Projectile Mass | 90.7 |
| Projectile Krupp | 2 400 |
| Projectile Detonator | 0.033 s |
| Detonator threshold | 32 mm |
| 4 x 1 102 mm/45 Mk V | |
| Reloading Time | 3.0 s |
| Sigma | 1.00 sigma |
| Shells | |
| Type of Projectile | HE – 102 mm HE 35 lb |
| Alpha Damage | 1 500 HP |
| Damage | 310 HP |
| HE penetration | 16 mm |
| Explosion Size | 0.3 |
| Chance to Cause Fire | 6 % |
| Projectile Speed | 811 m/s |
| Air Drag | 0.33 |
| Projectile Mass | 15.88 |
| 2 x 2 533 mm DR Mk II 533 mm Mk VII | |
| Reloading Time | 53 s |
| Maximum Distance | 7.0 km |
| Optimal firing angles at the front | 30° |
| Optimal firing angles at the rear | 30° |
| Damage | 15 733 |
| Speed | 59 kt |
| Surface Detectability | 1.2 km |
| 4 x 1 102 mm/45 Mk V | |
| Sector range | 0.1 km – 4.0 km |
| Hit chance | 90 % |
| Sector’s damage | 7 |
| Sector’s damage frequency | 0.29 s |
| Sector’s damage per second | 25 |
| Flak clouds number | 1 |
| Flak cloud damage | 910 |
| 4 x 1 40 mm/39 QF Mark II | |
| Sector range | 0.1 km – 2.5 km |
| Hit chance | 90 % |
| Sector’s damage | 20 |
| Sector’s damage frequency | 0.29 s |
| Sector’s damage per second | 70 |
| 4 x 1 7.7 mm Lewis | |
| Sector range | 0.1 km – 1.5 km |
| Hit chance | 85 % |
| Sector’s damage | 7 |
| Sector’s damage frequency | 0.29 s |
| Sector’s damage per second | 25 |
Slot 1 | Slot 2 | Slot 3 |
Damage Control Party I  Work time: 5 s Cooldown: 90 s | Repair Party I  Number of charges: 2 Work time: 28 s Cooldown: 120 s HP regeneration speed: 0.5% HP/s | Hydroacoustic Search I  Number of charges: 2 Work time: 180 s Cooldown: 180 s Torpedo detection range: 3.0 km Ship detection range: 3.0 km |
Damage Control Party II  Work time: 5 s Cooldown: 60 s | Repair Party II  Number of charges: 3 Work time: 28 s Cooldown: 80 s HP regeneration speed: 0.5% HP/s | Hydroacoustic Search II  Number of charges: 3 Work time: 180 s Cooldown: 120 s Torpedo detection range: 3.0 km Ship detection range: 3.0 km |
Fully upgraded
| Tier | V |
| Health | 32 200 HP |
| Main Armament | |
| Maximum Firing Range | 13.915 km |
| 190 mm/45 BL Mk VI | 7 x 1 190 mm |
| Secondary Armament | |
| Maximum Firing Range | 4.500 km |
| 102 mm/45 QF Mk XIX | 4 x 2 102 mm |
| Torpedo Armament | |
| Maximum Firing Range | 7.000 km |
| 533 mm DR Mk II | 2 x 2 533 mm |
| Maximum speed | 30 kt |
| Turning Circle Radius | 640 m |
| Rudder Shift Time | 9.1 s |
| Surface Detectability | 12.6 km |
| Air Detectability | 6.36 km |
| Detectability After Firing Main Gus in Smoke | 6.91 km |
| 7 x 1 190 mm/45 BL Mk VI | |
| Reloading Time | 13 s |
| 180 Degree Turn Time | 18.0 s |
| Optimal firing angles at the front | 30° for 4 guns 45° for 5 guns 64° for 6 guns |
| Optimal firing angles at the rear | 20° for 4 guns 52° for 6 guns |
| Sigma | 2.00 sigma |
| Maximum Dispersion | 129 m |
| Shells | |
| Type of Projectile | HE – 190 mm HE 200 fn. |
| Alpha Damage | 2 650 HP |
| Damage | 1 030 HP |
| Penetration capacity | 33 mm |
| Explosion size | 0.77 |
| Fire chance | 13 % |
| Projectile Speed | 844 m/s |
| Air Drag | 0.445 |
| Projectile Mass | 90.7 |
| Type of Projectile | AP – 190 mm AP 200 fn. |
| Alpha Damage | 4 050 HP |
| Chance to Cause Fire | -0.5 % |
| Projectile Speed | 844 m/s |
| Air Drag | 0.445 |
| Projectile Mass | 90.7 |
| Projectile Krupp | 2 400 |
| Projectile Detonator | 0.033 s |
| Detonator threshold | 32 mm |
| 4 x 2 102 mm/45 QF Mk XIX | |
| Reloading Time | 3.0 s |
| Sigma | 1.00 sigma |
| Shells | |
| Type of Projectile | HE – 102 mm HE 35 lb |
| Alpha Damage | 1 500 HP |
| Damage | 310 HP |
| HE penetration | 16 mm |
| Explosion Size | 0.3 |
| Chance to Cause Fire | 6 % |
| Projectile Speed | 811 m/s |
| Air Drag | 0.33 |
| Projectile Mass | 15.88 |
| 2 x 2 533 mm DR Mk II 533 mm Mk VII | |
| Reloading Time | 53 s |
| Maximum Distance | 7.0 km |
| Optimal firing angles at the front | 30° |
| Optimal firing angles at the rear | 30° |
| Damage | 15 733 |
| Speed | 59 kt |
| Surface Detectability | 1.2 km |
| 4 x 2 102 mm/45 QF Mk XIX | |
| Sector range | 0.1 km – 5.8 km |
| Hit chance | 90 % |
| Sector’s damage | 17 |
| Sector’s damage frequency | 0.29 s |
| Sector’s damage per second | 60 |
| Flak clouds number | 2 |
| Flak cloud damage | 1 050 |
| 4 x 4 40 mm Vickers 2-pdr. Mk VII | |
| Sector range | 0.1 km – 2.5 km |
| Hit chance | 90 % |
| Sector’s damage | 36 |
| Sector’s damage frequency | 0.29 s |
| Sector’s damage per second | 126 |
| 4 x 4 12.7 mm Mk III | |
| Sector range | 0.1 km – 1.5 km |
| Hit chance | 85 % |
| Sector’s damage | 6 |
| Sector’s damage frequency | 0.29 s |
| Sector’s damage per second | 21 |
Slot 1 | Slot 2 | Slot 3 |
Damage Control Party I Work time: 5 s Cooldown: 90 s | Repair Party I Number of charges: 2 Work time: 28 s Cooldown: 120 s HP regeneration speed: 0.5% HP/s | Hydroacoustic Search I Number of charges: 2 Work time: 180 s Cooldown: 180 s Torpedo detection range: 3.0 km Ship detection range: 3.0 km |
Damage Control Party II Work time: 5 s Cooldown: 60 s | Repair Party II Number of charges: 3 Work time: 28 s Cooldown: 80 s HP regeneration speed: 0.5% HP/s | Hydroacoustic Search II Number of charges: 3 Work time: 180 s Cooldown: 120 s Torpedo detection range: 3.0 km Ship detection range: 3.0 km |
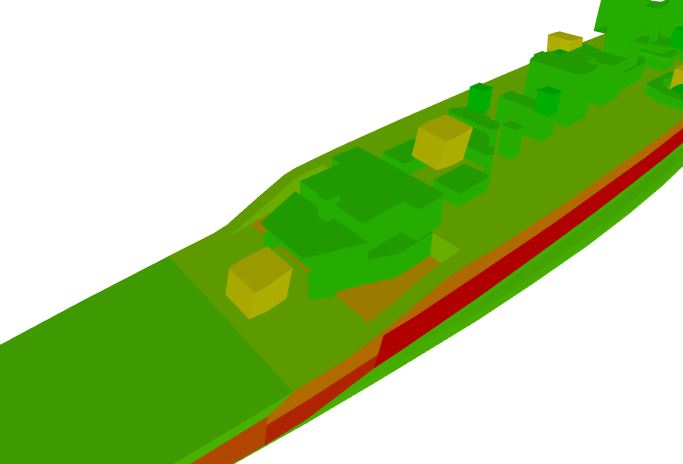
The armor
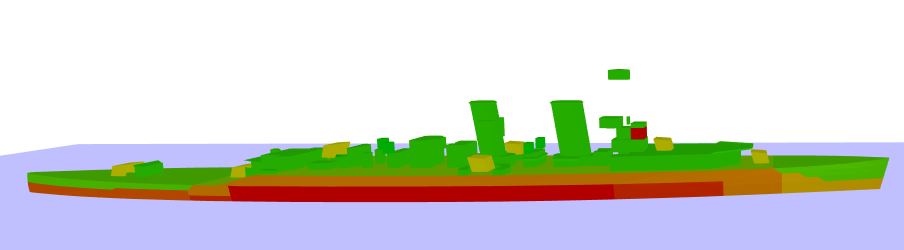
The Hawkins has… a quite interesting armor scheme. It is well armored if angled but once you start trying to bring more than 4 guns to bear… you are asking to die.
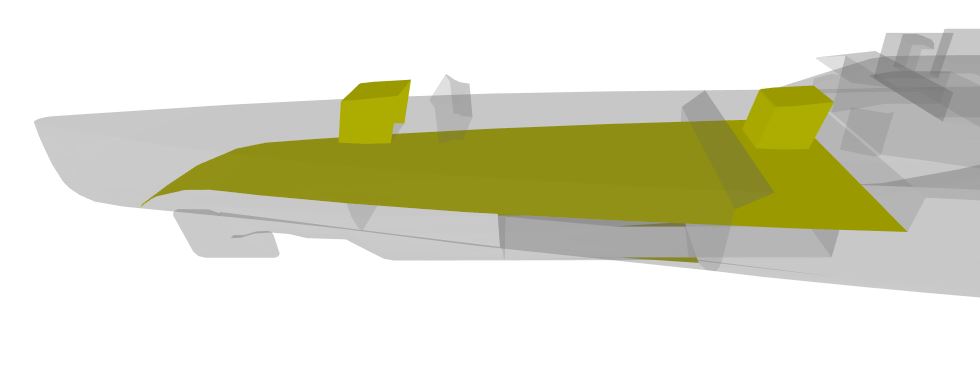
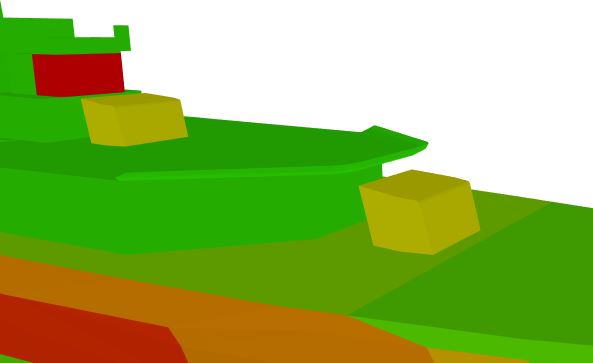
The bow section
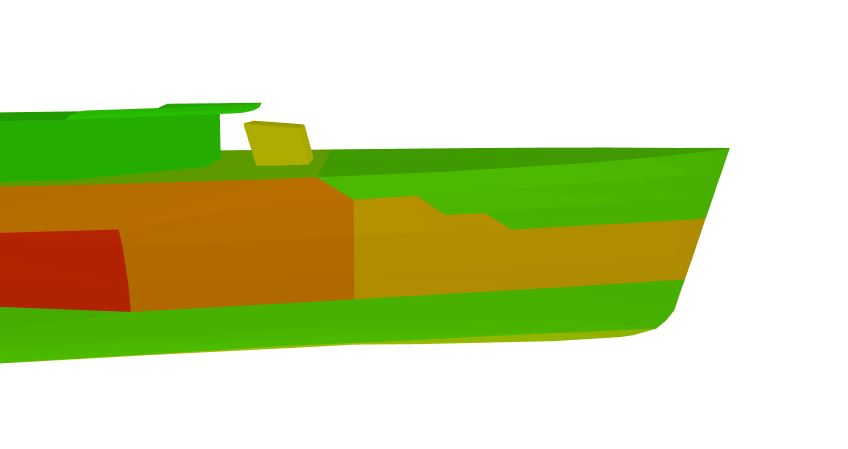
The bow of the Hawkins is fairly well protected. The upper part is 13 mm thick meaning that 203 mm AP shells and up will overmatch it. However, she has an extended belt that reaches the end of the bow and that is 37 mm thick. This will allow the ship to angle even against battleship and to be able to bounce shells.

The casemate that protects the middle section is a single plate of 13 mm. The citadel of the ship is further back so it could actually help against shells going through the bow as they could potentially detonate before.
The middle section
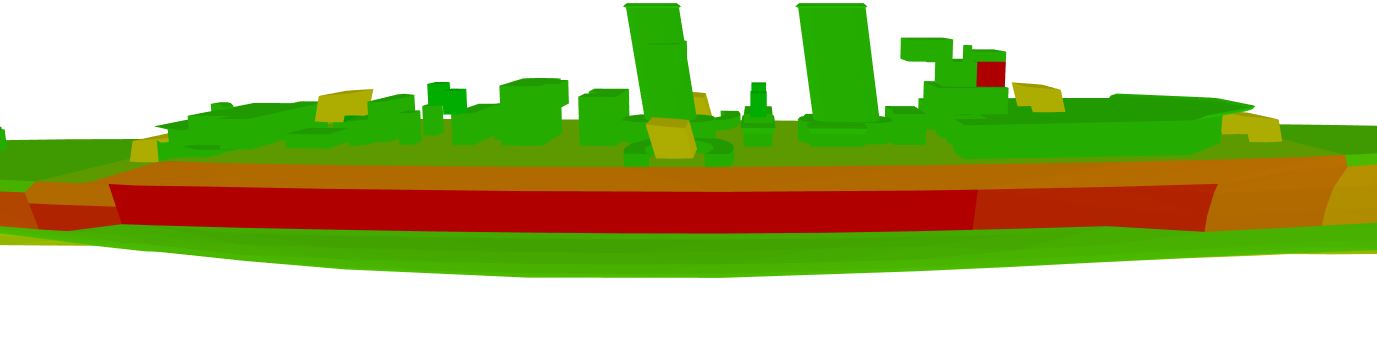
The ship is surprisingly well-armored for a cruiser. The deck is 16 mm thick so for that, nothing special. However, the upper belt and the side armor under the first turret are 51 mm thick. For the main belt which is the citadel, it is 64 mm thick on the extremities and the middle part is 76 mm thick. When angled, this is a really good armor for a cruiser. Once you start giving broadside to use the rear turrets… it’s another story. It’s not like at high tier with big caliber AP that will overpenetrate soft targets. At low tier, the shells are slower which means that the shells will have in general plenty of time to detonate inside the ship, especially on a heavy cruiser.
At the front and at the rear, the citadel’s athwartships are only 16 mm thick and the same goes for the citadel deck under the front guns.
If anything passes the external armor, don’t expect it to stop on these. The shell will just go through like it was butter.
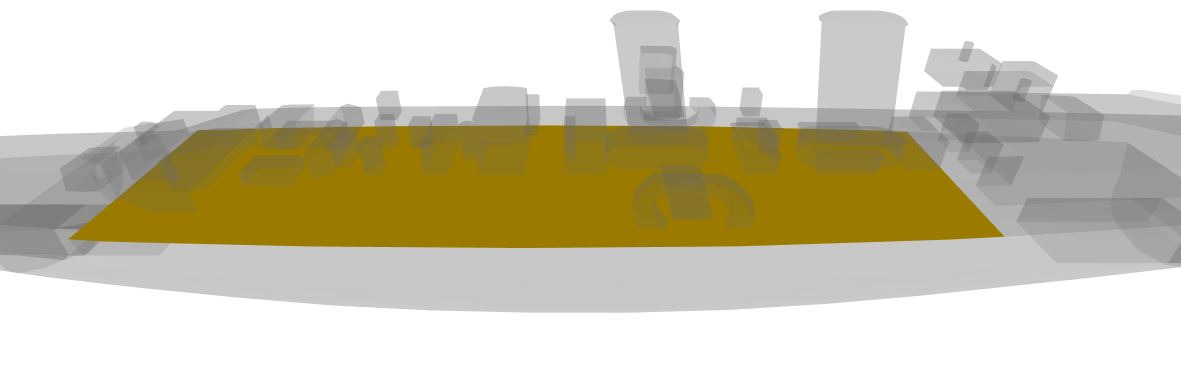
For the biggest part of the citadel deck, it is 38 mm thick. AP bombs will just go through that without issue. The same goes for AP shells if they have the angle aaaaaand… also HE shells and bombs.
It turns out that her citadel deck is partially exposed (here in orange) so HE shells and bombs will cause citadel damage if they have enough penetration.
For the last part of the citadel deck, it is 25 mm thick and is prolonged by an armored deck inside the stern that will protect the 16 mm athwartship.
The stern section
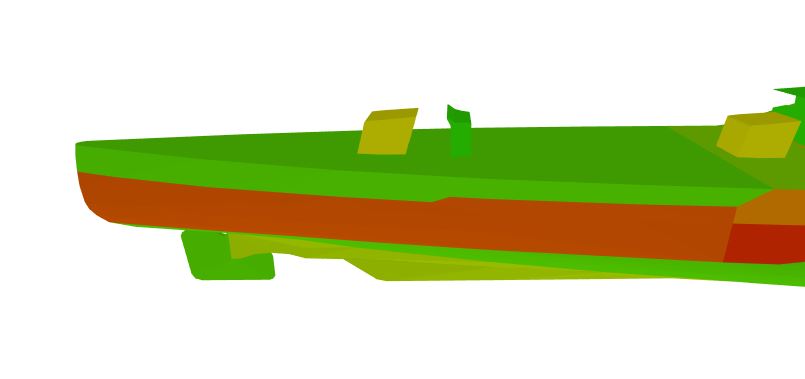
The stern is even more protected than the bow. There is still the 13 mm plating but this time, the large extended belt is covered by 57 mm of armor. Once again, stay angled against AP shells and that ship will definitely hold her ground against battleships.
The superstructure
The superstructure spreads across the whole ship and is 10 mm thick.
The turrets
The gunshields on the Hawkins are 25 mm thick. You can get ready for HE shells from cruisers jamming the turrets on this ship. Then again, I still have to find a gunshield that provides decent protection.
Personal Opinion
I’m for now quite scared of this ship. The ballistic with the huge air drag will be a pain to work with, the firing angles are simply bad and while the ship has a good armor when she is angled, if you want to use all guns, you are asking to die.
For now, I really hope that this is not a bigger Emerald but it looks like it…