
World of Warships Supertest: British Tier IX Battleship Duncan
7 min read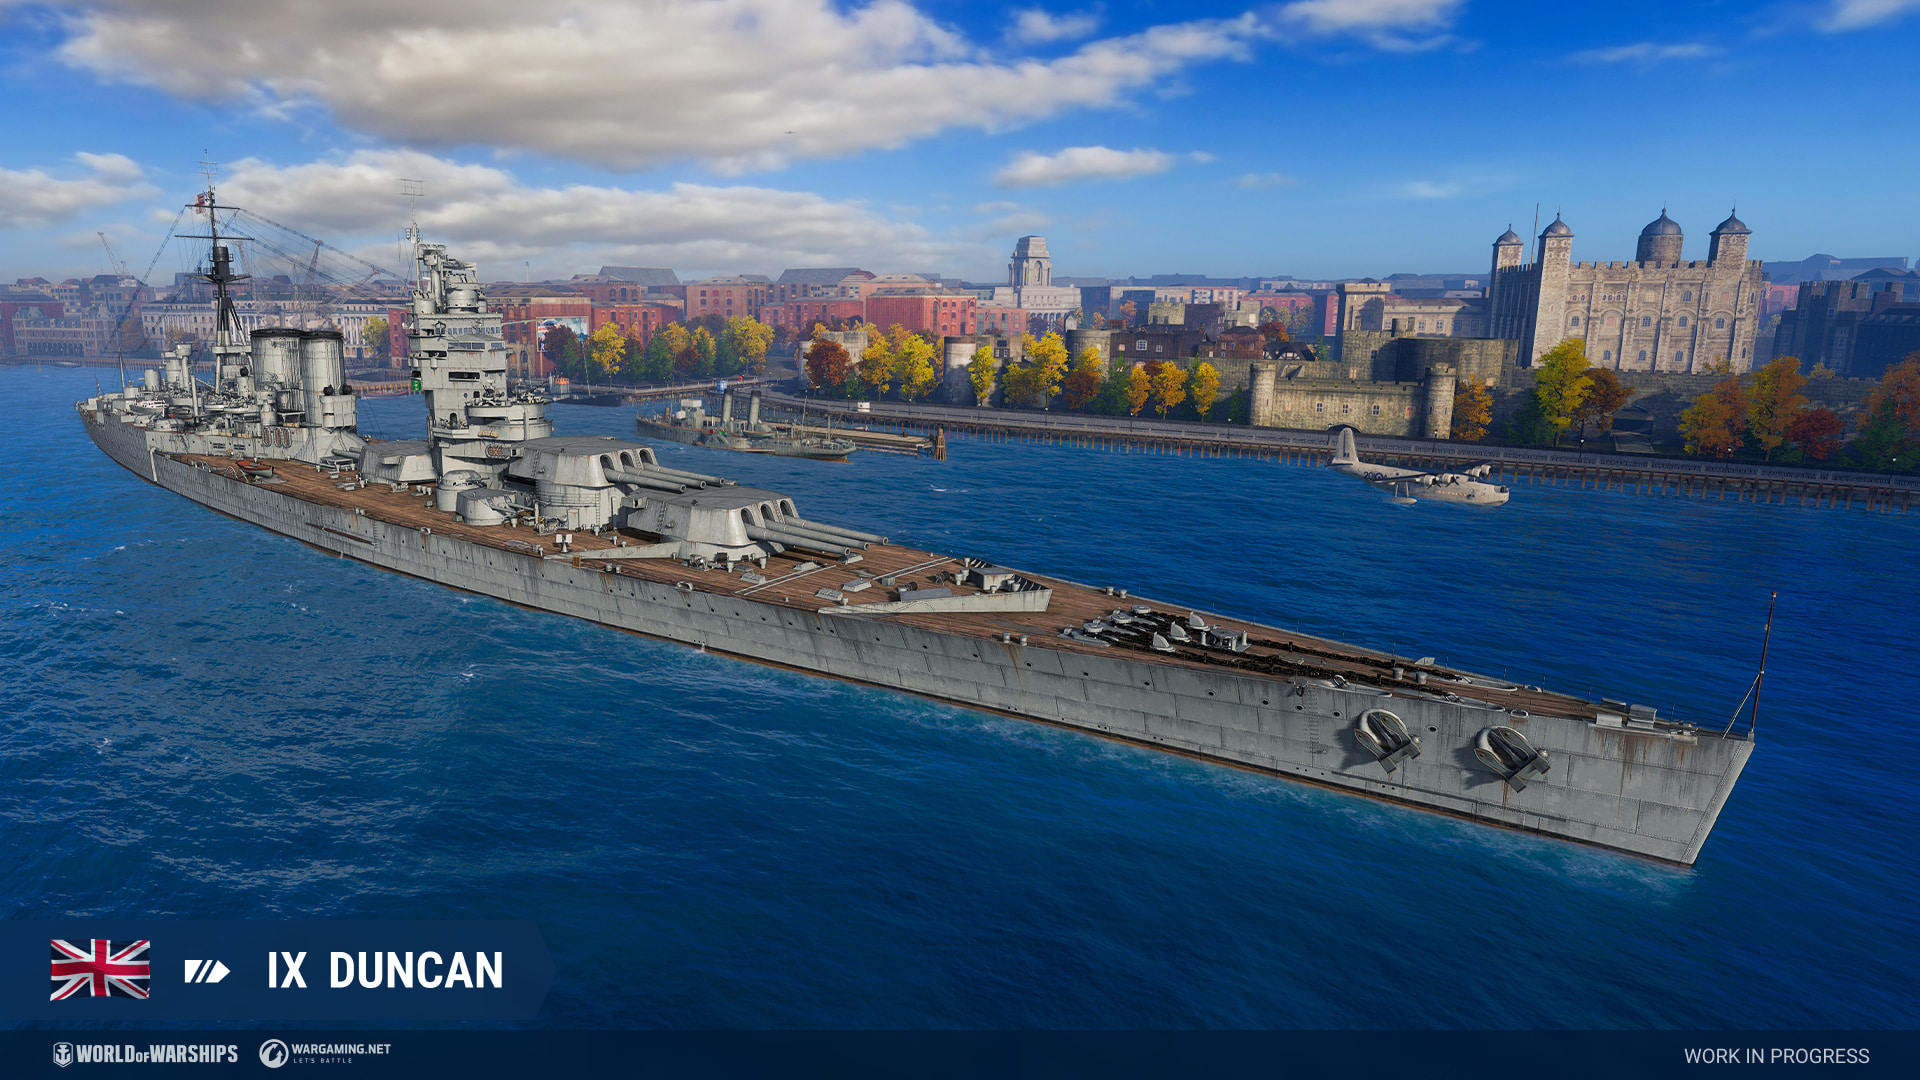
Historical background
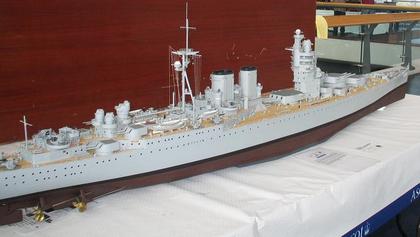
So… it’s time to look at high-tier British battlecruisers and it’s also time to empty my local shop’s supply of bleach to wash my eyes. Good God, are Duncan and St. Vincent ugly. I don’t know if it’s the British who wanted to scare the enemy to death or if their sense of aesthetics died during the early 1920s but these things are making me cry blood.
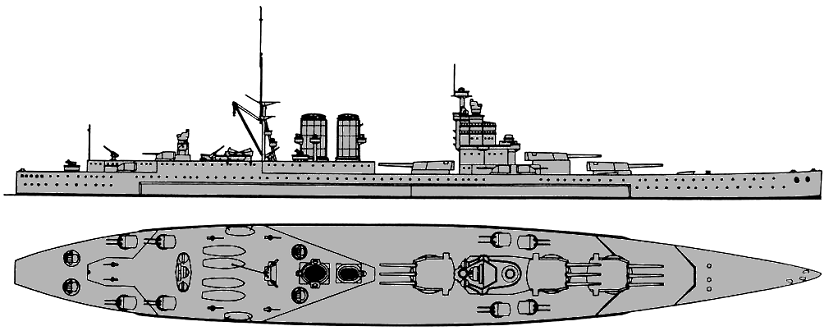
Duncan is based on the G3 design of battlecruisers from the Royal Navy. This design was made as part of an answer to the expansion programs made by the United States and Japan. One of the main criteria of the design was that it would match the 32 knots estimated speed of the American Lexington-class battlecruisers. Another problem was that the design had to be able to use existing dockyards.
Out of the various proposals, G3 was the one selected as it presented a well-optimized design; saving weight so that the desirable speed could be achieved while also keeping a compact hull. As such, the ships were meant to be armed with nine 16.5-inch (419 mm) guns in three triple turrets; two superfiring at the front and the third one located between the front superstructure and the funnels. The design was accepted at the end of 1920 with four ships ordered. However, changes were made when plans were finalized in 1921. The main battery caliber was brought down to 16-inch guns (406 mm) and the design’s engine power was also brought down from 180 000 horsepower to 160 000.
In the end, the Washington Naval Treaty of 1922 saved everyone’s eyes as G3 had to be canceled due to the limitation on the allowed tonnage of ships that could not exceed 35 000 tons. All of this wasn’t for nothing though as some of the design choices of G3 were later implemented on the Nelson-class battleships.
If you want to learn more about the G3 design as well as the other battlecruisers designs from the Royal Navy, here is a video from Drachinifel covering them:
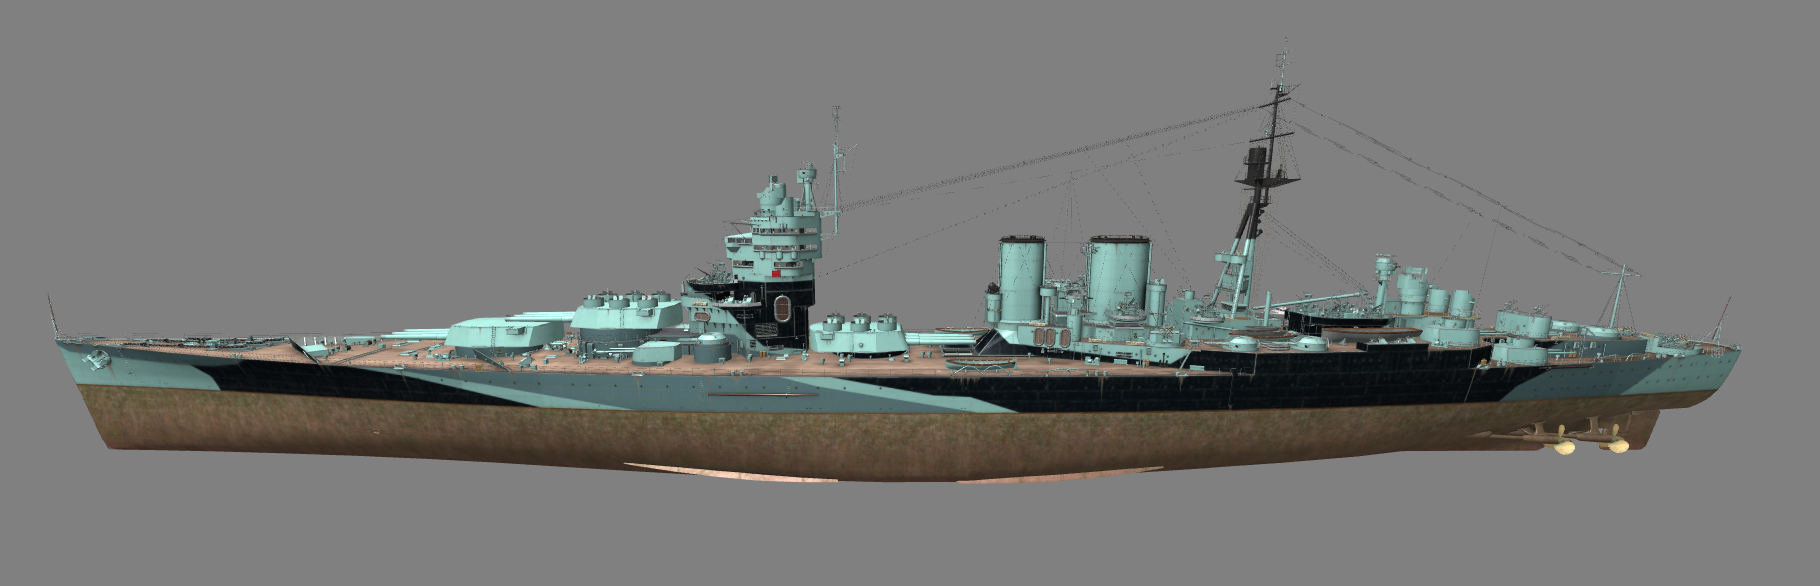
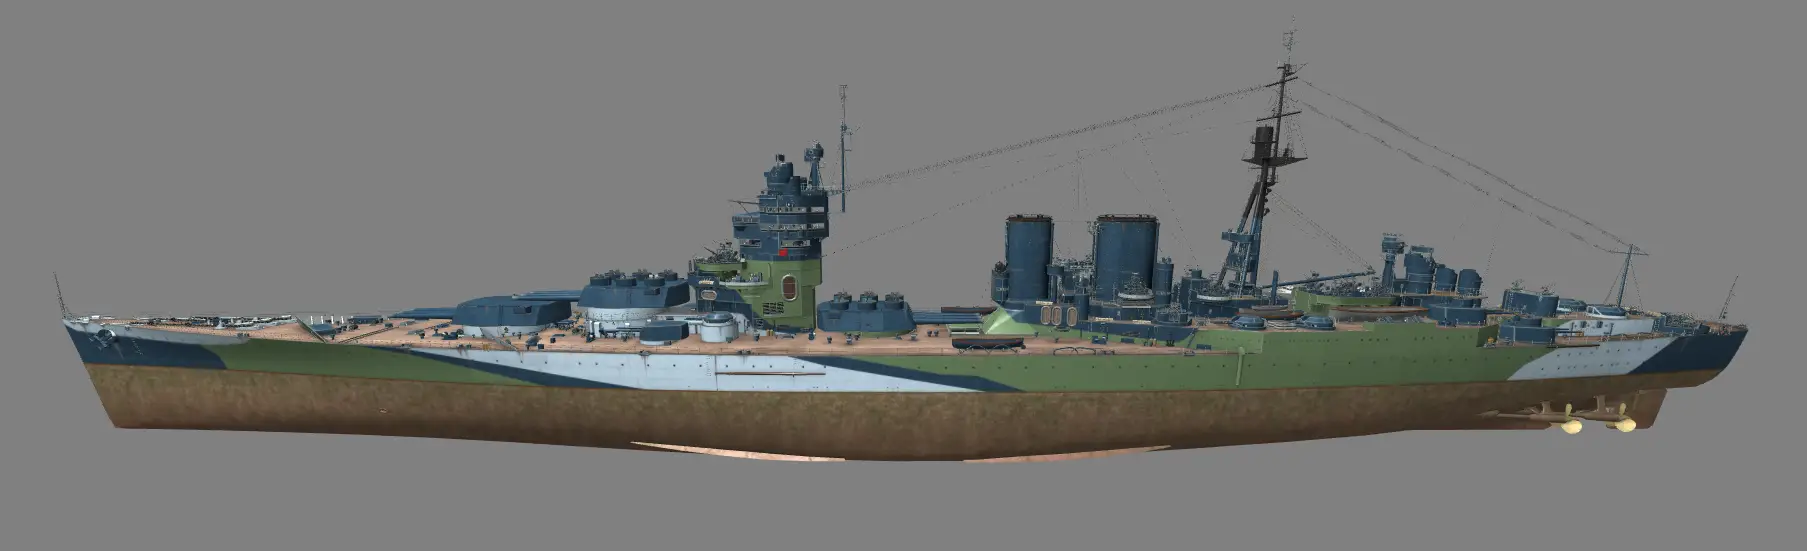
Ship’s preview
Ship’s camouflage
For the classic reminder, this is a ship in testing, anything can change so don’t look at her like she would already be released.
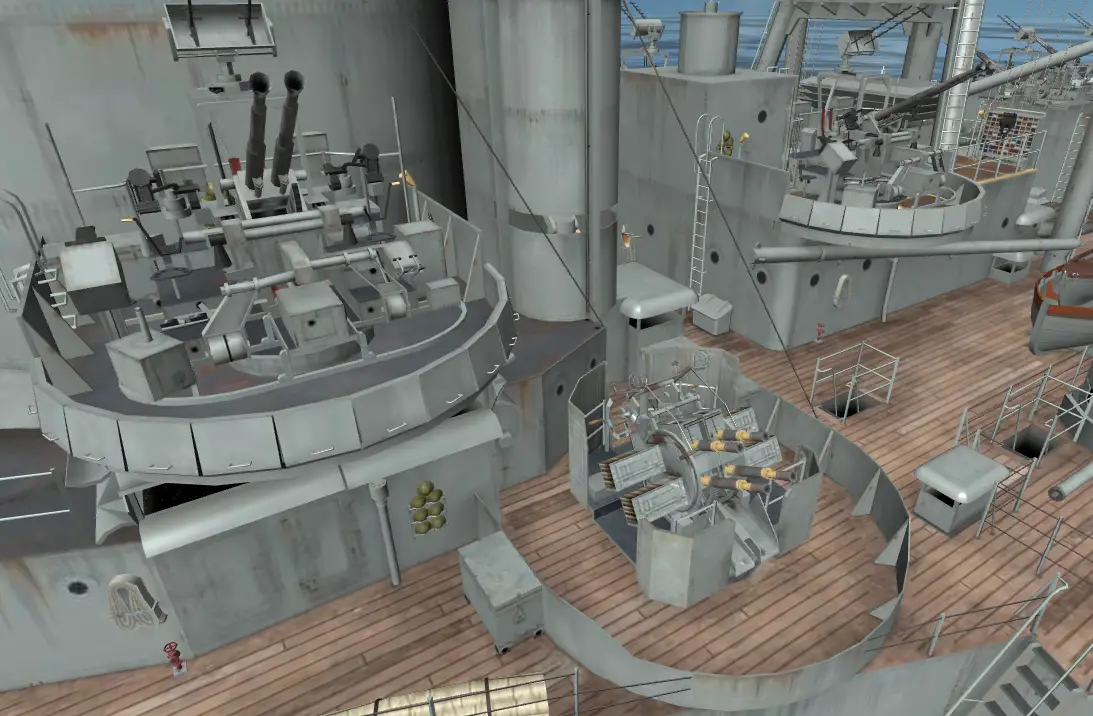
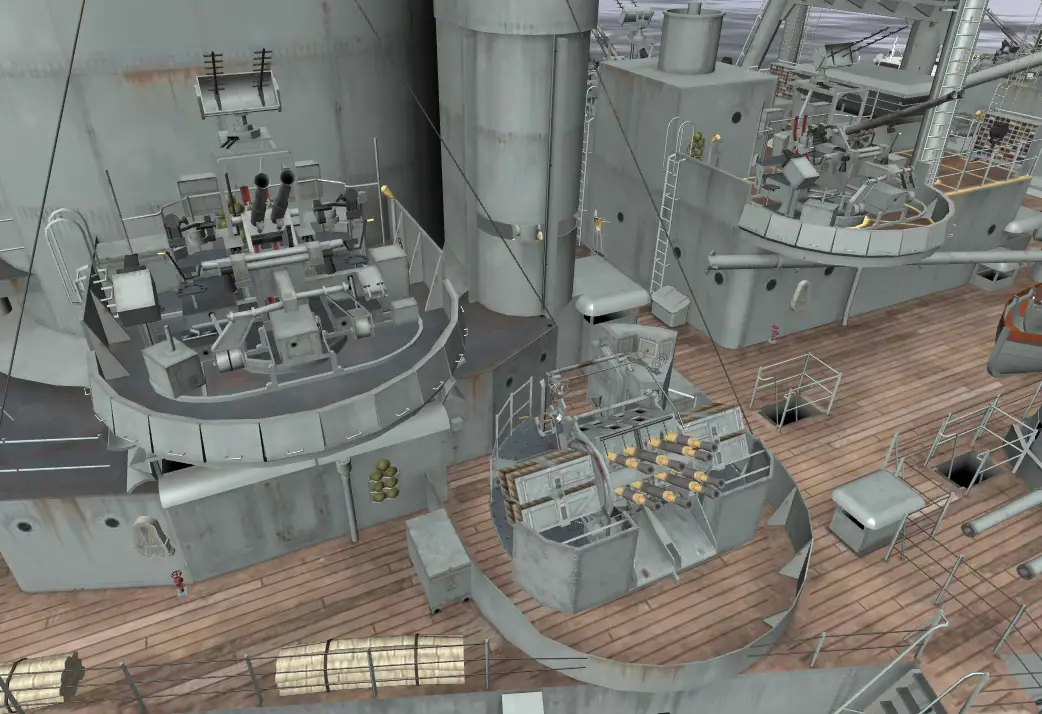
![]()
Modules
Hull | Engine | Gun Fire Control System | Main battery | Torpedoes |
Duncan (A) |
Propulsion: 160 000 HP |
Mk IX mod. 1 | 419 mm/45 Mk.I on a Mk.I mount |
622 mm Mk I |
Duncan (B) |
Mk IX mod. 2 |
Stock Ship
General Characteristics
| Tier | IX |
| Health | 66 900 HP |
| Torpedo Damage Reduction | 23 % |
| Displacement | 47 438 tons |
| Dimensions | |
| Overall length | 262.74 m |
| Beam | 32.29 m |
| Overall height (keel to the highest point on the ship) | 30.7 m |
| Freeboard | 5.42 m |
| Main Armament | |
| Maximum Firing Range | 17.220 km |
| 419 mm/45 Mk.I on a Mk.I mount | 3 x 3 419 mm |
| Secondary Armament | |
| Maximum Firing Range | 6.950 km |
| 152 mm/50 BL Mk.XXII on a Mk.XVIII mount 113 mm/45 QF Mk.I/III on an RP10 Mark II BD mount | 6 x 2 152 mm 8 x 2 113 mm |
| Torpedo Armament | |
| Maximum Firing Range | 10.000 km |
| 622 mm PR Mk II | 2 x 1 622 mm |
| Maximum speed | 32.0 knots |
| Turning Circle Radius | 910 m |
| Rudder Shift Time | 23.0 s |
| Surface Detectability | 15.34 km |
| Air Detectability | 11.55 km |
| Detectability After Firing Main Guns in Smoke | 15.19 km |
Main Armament
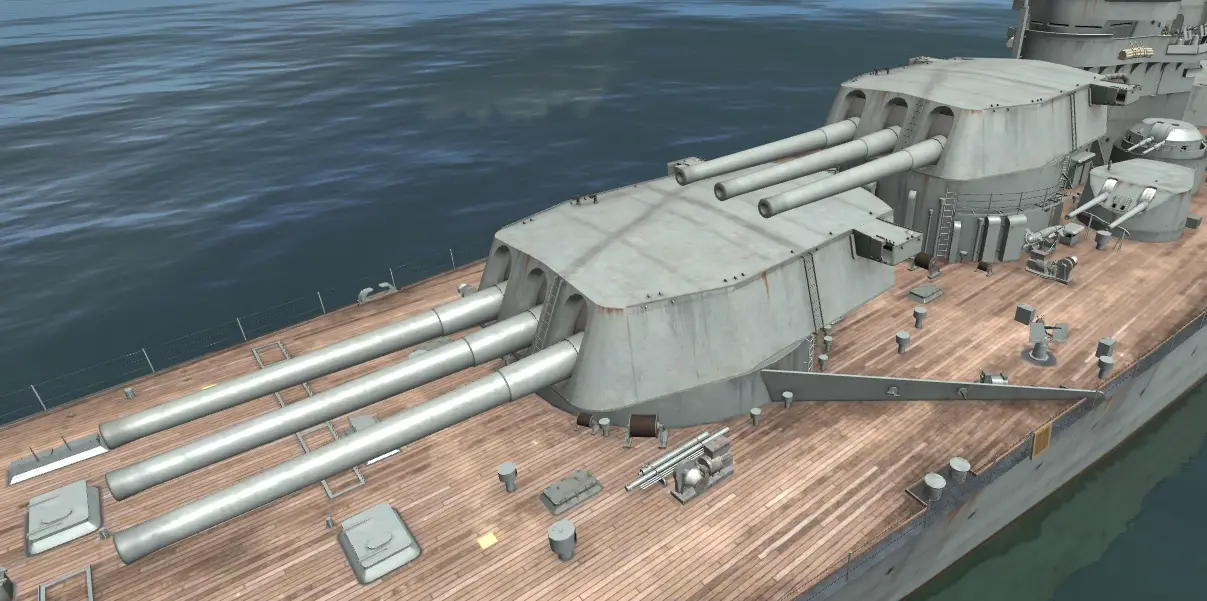
| 3 x 3 419 mm/45 Mk.I on a Mk.I mount | |
| Maximum Firing Range | 17.220 km |
| Reloading Time | 30.0 s |
| 180 Degree Turn Time | 30.0 s |
| Optimal firing angles at the front | 30° |
| Optimal firing angles at the rear | 30° |
| Sigma | 1.5 sigma |
| Maximum Dispersion | 193 m |
| Shells | |
| Type of Projectile | HE – 419 mm HE Mk Ia |
| Alpha Damage | 6 150 |
| Penetration capacity | 70 mm |
| Explosion size | 2.73 |
| Fire chance | 47 % |
| Projectile Speed | 792 m/s |
| Air Drag | 0.31 |
| Projectile Mass | 995.0 kg |
| Type of Projectile | AP – 419 mm AP Mk IIa |
| Alpha Damage | 13 050 |
| Projectile Speed | 747 m/s |
| Air Drag | 0.235 |
| Projectile Mass | 1 157.0 kg |
| Projectile Krupp | 2 548 |
| Projectile Detonator | 0.015 s |
| Detonator threshold | 70 mm |
| Ricochet Angles | 45° – 60° |
Secondary Armament
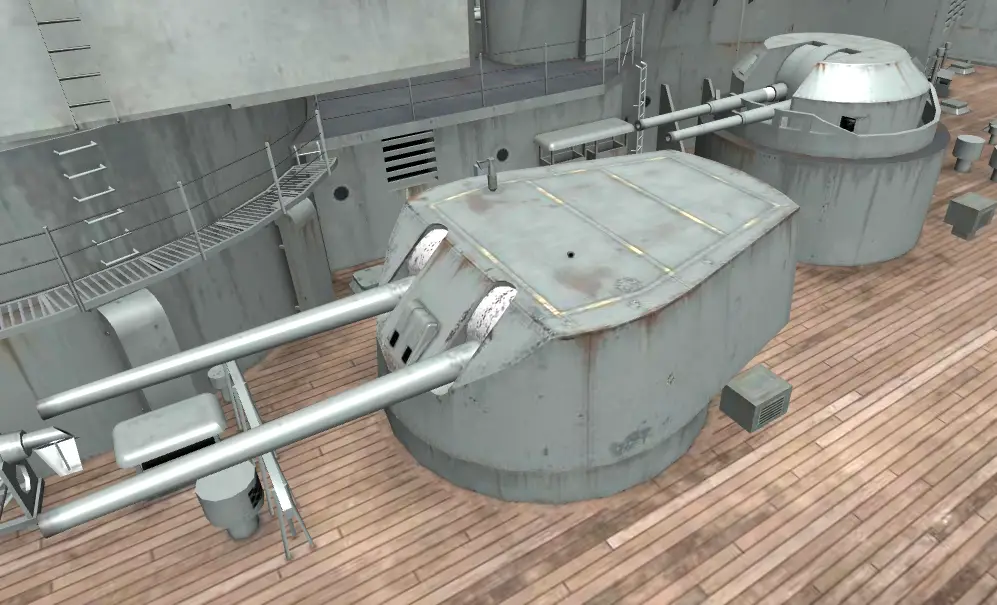
| 6 x 2 152 mm/50 BL Mk.XXII on a Mk.XVIII mount | |
| Maximum Firing Range | 6.950 km |
| Reloading Time | 12.0 s |
| Sigma | 1.0 sigma |
| Shells | |
| Type of Projectile | HE – 152 mm HE Mk V |
| Alpha Damage | 2 150 |
| HE penetration | 25 mm |
| Explosion Size | 0.54 |
| Chance to Cause Fire | 9 % |
| Projectile Speed | 884 m/s |
| Air Drag | 0.362 |
| Projectile Mass | 50.8 kg |
| 8 x 2 113 mm/45 QF Mk.I/III on an RP10 Mark II BD mount | |
| Maximum Firing Range | 6.950 km |
| Reloading Time | 5.0 s |
| Sigma | 1.0 sigma |
| Shells | |
| Type of Projectile | HE – 113 mm HE 5crh |
| Alpha Damage | 1 700 |
| HE penetration | 19 mm |
| Explosion Size | 0.38 |
| Chance to Cause Fire | 8 % |
| Projectile Speed | 746 m/s |
| Air Drag | 0.329 |
| Projectile Mass | 24.95 kg |
Torpedo Armament

| 2 x 1 622 mm PR Mk II 622 mm Mk I | |
| Reloading Time | 55 s |
| Maximum Distance | 10.000 km |
| Optimal firing angles | 71°-91° |
| Damage | 21 067 |
| Flooding Chance | 355% |
| Speed | 67 knots |
| Surface Detectability | 1.7 km |
Anti-air Armament
| 8 x 2 113 mm/45 QF Mk.I/III on an RP10 Mark II BD mount | |
| Sector range | 0.1 km – 5.8 km |
| Hit chance | 75 % |
| Sector’s damage | 24 |
| Sector’s damage frequency | 0.29 s |
| Sector’s damage per second | 81 |
| Flak clouds number | 4 |
| Flak cloud damage | 1 260 |
| 4 x 4 40 mm/39 Vickers QF Mk.VIII on a Mk.VII mount 10 x 2 40 mm/56 OQF Mk.1/2 on a Mk.IV mount | |
| Sector range | 0.1 km – 3.5 km |
| Hit chance | 75 % |
| Sector’s damage | 134 |
| Sector’s damage frequency | 0.29 s |
| Sector’s damage per second | 469 |
| 10 x 1 20 mm Oerlikon Mk.I on a Mk.IIA mount | |
| Sector range | 0.1 km – 2.0 km |
| Hit chance | 70 % |
| Sector’s damage | 21 |
| Sector’s damage frequency | 0.29 s |
| Sector’s damage per second | 74 |
Consumables
Slot 1 | Slot 2 | Slot 3 | Slot 4 |
Damage Control Party  Work time: 15 s Work time: 15 sCooldown: 80 s | Repair Party  Number of charges: 3 Number of charges: 3Work time: 20 s Cooldown: 80 s HP regeneration speed: +2.0%/s Casemate damage regeneration: 50% Citadel damage regeneration: 10% | Engine Boost  Number of charges: 3 Number of charges: 3Work time: 120 s Cooldown: 120 s Speed bonus: +8% | Defensive AA Fire
Number of charges: 3 Work time: 40 s Cooldown: 80 s Damage from continuous DPS: +50% Damage from flak explosions: +300% |

Fully Upgraded Ship
General Characteristics
| Tier | IX |
| Health | 75 200 HP |
| Torpedo Damage Reduction | 23 % |
| Displacement | 54 390 tons |
| Dimensions | |
| Overall length | 262.74 m |
| Beam | 32.29 m |
| Overall height (keel to the highest point on the ship) | 30.7 m |
| Freeboard | 5.42 m |
| Main Armament | |
| Maximum Firing Range | 18.942 km |
| 419 mm/45 Mk.I on a Mk.I mount | 3 x 3 419 mm |
| Secondary Armament | |
| Maximum Firing Range | 6.950 km |
| 152 mm/50 BL Mk.XXII on a Mk.XVIII mount 113 mm/45 QF Mk.I/III on an RP10 Mark II BD mount | 6 x 2 152 mm 8 x 2 113 mm |
| Torpedo Armament | |
| Maximum Firing Range | 10.000 km |
| 622 mm PR Mk II | 2 x 1 622 mm |
| Maximum speed | 32.0 knots |
| Turning Circle Radius | 910 m |
| Rudder Shift Time | 16.4 s |
| Surface Detectability | 15.34 km |
| Air Detectability | 11.55 km |
| Detectability After Firing Main Guns in Smoke | 15.19 km |
Main Armament
| 3 x 3 419 mm/45 Mk.I on a Mk.I mount | |
| Maximum Firing Range | 18.942 km |
| Reloading Time | 30.0 s |
| 180 Degree Turn Time | 30.0 s |
| Optimal firing angles at the front | 30° |
| Optimal firing angles at the rear | 30° |
| Sigma | 1.5 sigma |
| Maximum Dispersion | 208 m |
| Shells | |
| Type of Projectile | HE – 419 mm HE Mk Ia |
| Alpha Damage | 6 150 |
| Penetration capacity | 70 mm |
| Explosion size | 2.73 |
| Fire chance | 47 % |
| Projectile Speed | 792 m/s |
| Air Drag | 0.31 |
| Projectile Mass | 995.0 kg |
| Type of Projectile | AP – 419 mm AP Mk IIa |
| Alpha Damage | 13 050 |
| Projectile Speed | 747 m/s |
| Air Drag | 0.235 |
| Projectile Mass | 1 157.0 kg |
| Projectile Krupp | 2 548 |
| Projectile Detonator | 0.015 s |
| Detonator threshold | 70 mm |
| Ricochet Angles | 45° – 60° |
Secondary Armament
| 6 x 2 152 mm/50 BL Mk.XXII on a Mk.XVIII mount | |
| Maximum Firing Range | 6.950 km |
| Reloading Time | 12.0 s |
| Sigma | 1.0 sigma |
| Shells | |
| Type of Projectile | HE – 152 mm HE Mk V |
| Alpha Damage | 2 150 |
| HE penetration | 25 mm |
| Explosion Size | 0.54 |
| Chance to Cause Fire | 9 % |
| Projectile Speed | 884 m/s |
| Air Drag | 0.362 |
| Projectile Mass | 50.8 kg |
| 8 x 2 113 mm/45 QF Mk.I/III on an RP10 Mark II BD mount | |
| Maximum Firing Range | 6.950 km |
| Reloading Time | 5.0 s |
| Sigma | 1.0 sigma |
| Shells | |
| Type of Projectile | HE – 113 mm HE 5crh |
| Alpha Damage | 1 700 |
| HE penetration | 19 mm |
| Explosion Size | 0.38 |
| Chance to Cause Fire | 8 % |
| Projectile Speed | 746 m/s |
| Air Drag | 0.329 |
| Projectile Mass | 24.95 kg |
Torpedo Armament
| 2 x 1 622 mm PR Mk II 622 mm Mk I | |
| Reloading Time | 55 s |
| Maximum Distance | 10.000 km |
| Optimal firing angles | 71°-91° |
| Damage | 21 067 |
| Flooding Chance | 355% |
| Speed | 67 knots |
| Surface Detectability | 1.7 km |
Anti-air Armament
| 6 x 2 113 mm/45 QF Mk.I/III on an RP10 Mark II BD mount | |
| Sector range | 0.1 km – 5.8 km |
| Hit chance | 75 % |
| Sector’s damage | 23 |
| Sector’s damage frequency | 0.29 s |
| Sector’s damage per second | 81 |
| Flak clouds number | 4 |
| Flak cloud damage | 1 260 |
| 4 x 8 40 mm/39 Vickers QF Mk.VIII on a Mk.VI mount 10 x 2 40 mm/56 OQF Mk.1/2 on a Mk.IV mount | |
| Sector range | 0.1 km – 3.5 km |
| Hit chance | 75 % |
| Sector’s damage | 144 |
| Sector’s damage frequency | 0.29 s |
| Sector’s damage per second | 504 |
| 18 x 1 20 mm Oerlikon Mk.I on a Mk.IIA mount 10 x 2 20 mm Oerlikon Mk.I on a Mk.IIA mount | |
| Sector range | 0.1 km – 2.0 km |
| Hit chance | 70 % |
| Sector’s damage | 71 |
| Sector’s damage frequency | 0.29 s |
| Sector’s damage per second | 249 |
Consumables
Slot 1 | Slot 2 | Slot 3 | Slot 4 |
Damage Control Party Work time: 15 sCooldown: 80 s | Repair Party Number of charges: 3Work time: 20 s Cooldown: 80 s HP regeneration speed: +2.0%/s Casemate damage regeneration: 50% Citadel damage regeneration: 10% | Engine Boost Number of charges: 3Work time: 120 s Cooldown: 120 s Speed bonus: +8% | Defensive AA Fire
Number of charges: 3 Work time: 40 s Cooldown: 80 s Damage from continuous DPS: +50% Damage from flak explosions: +300% |
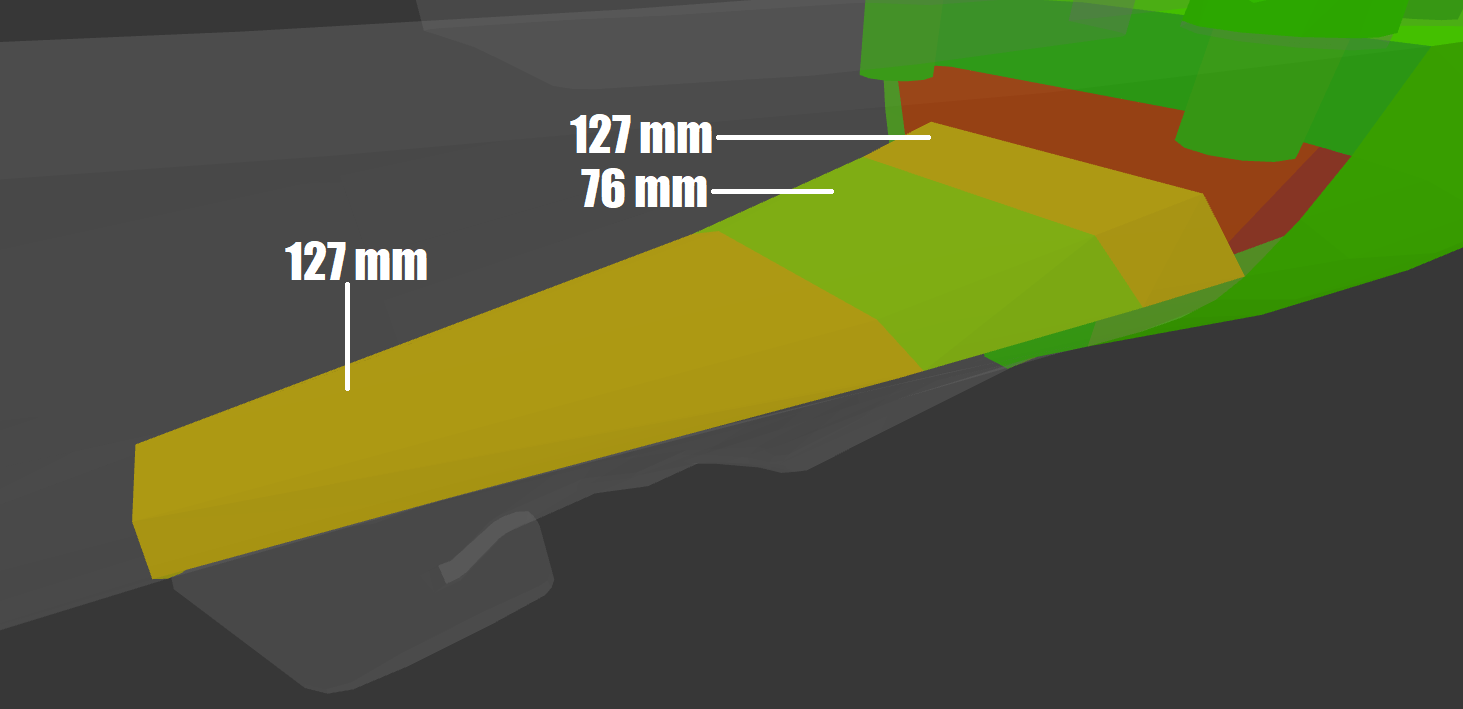
The Armor
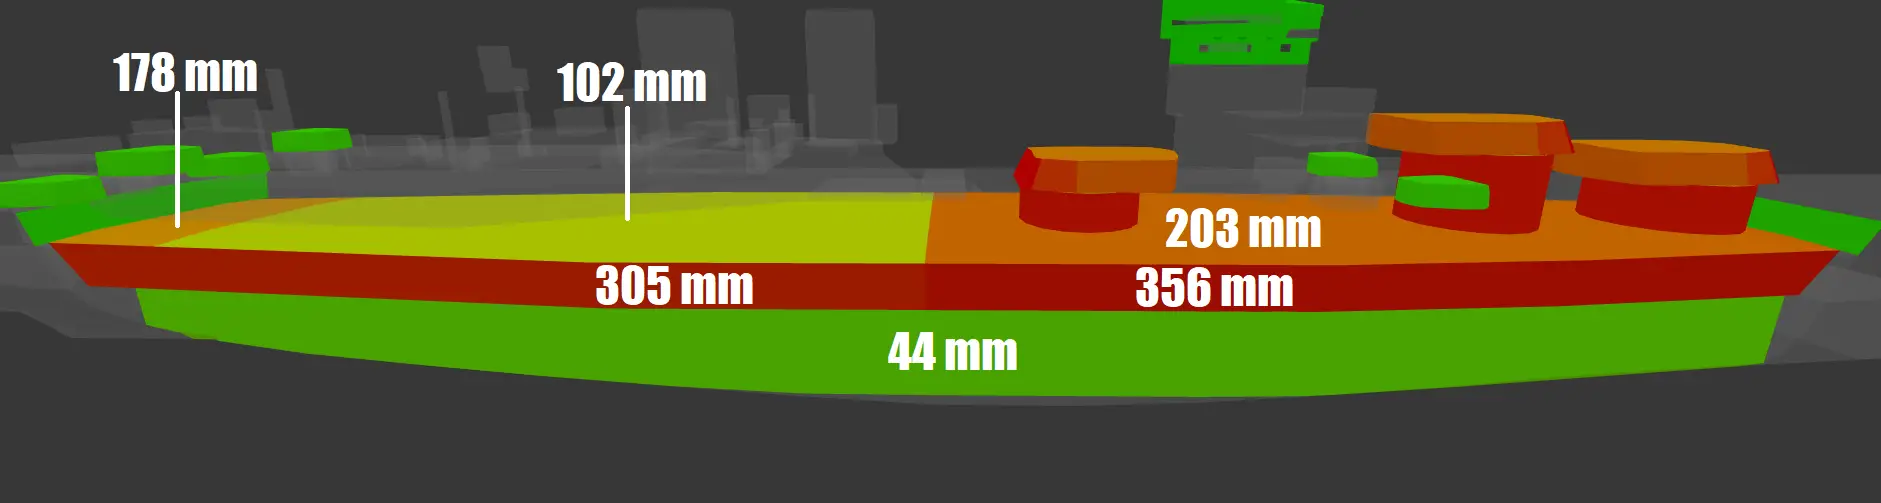
External armor protection:
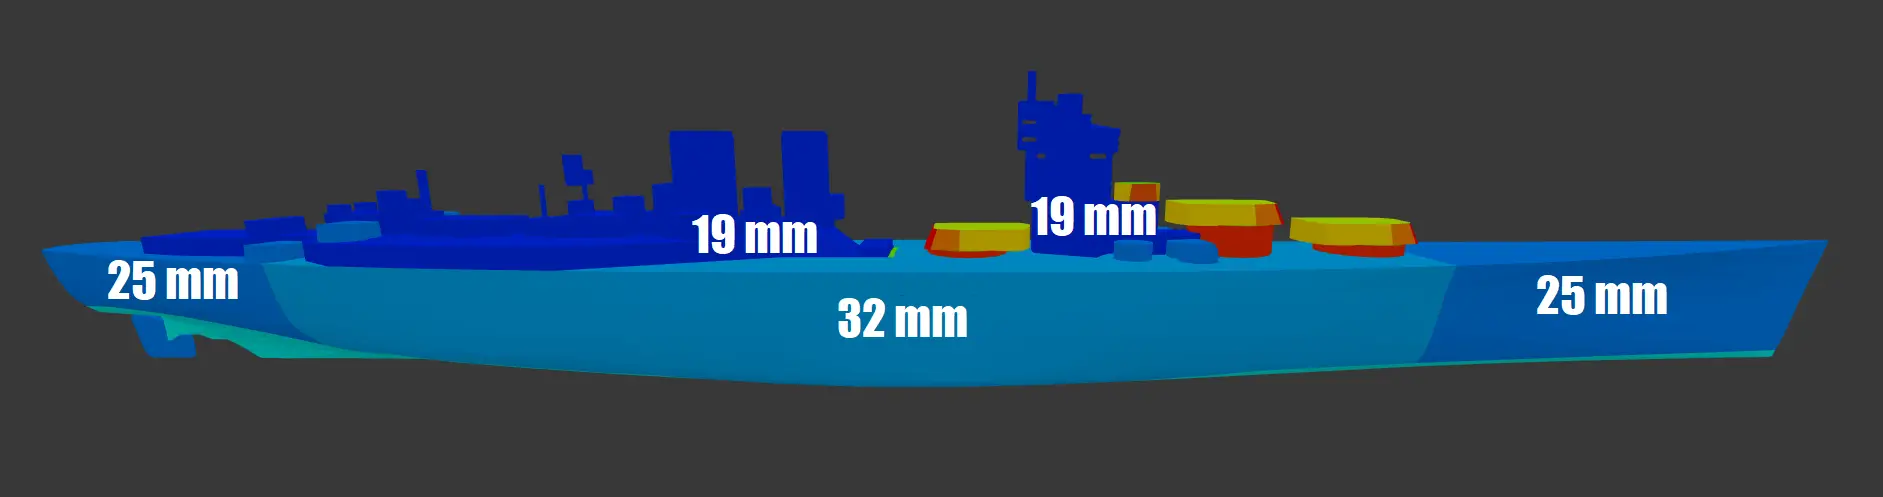
Front and rear armor protection of the middle section:
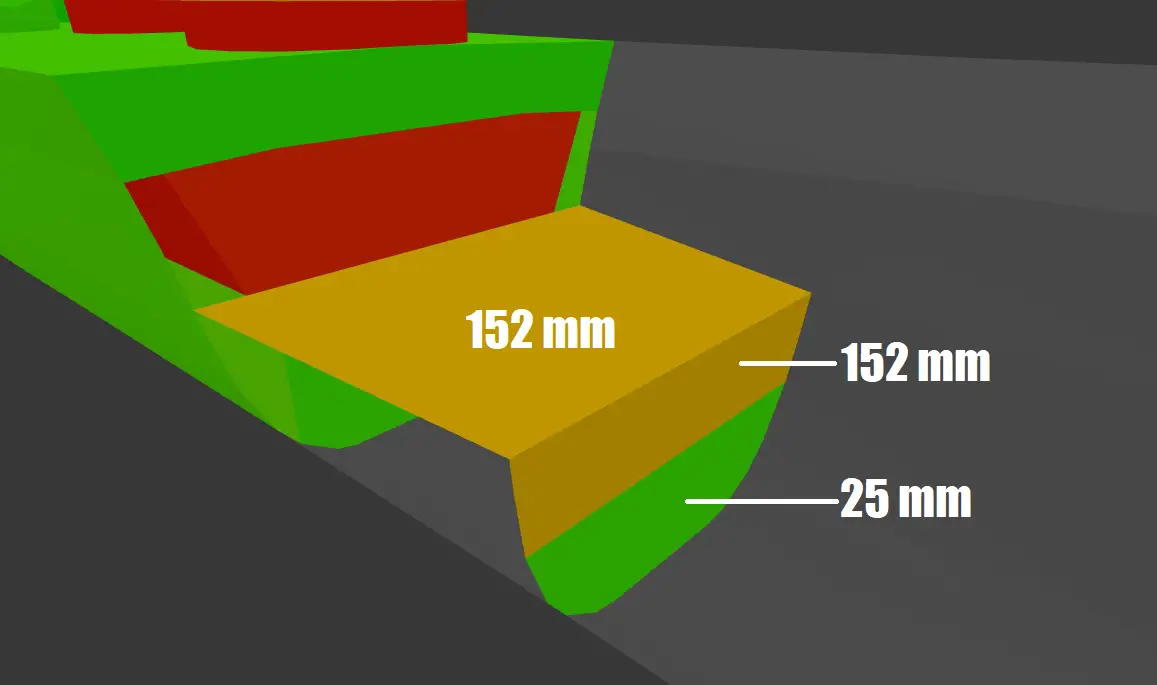
Armored deck under the funnels:

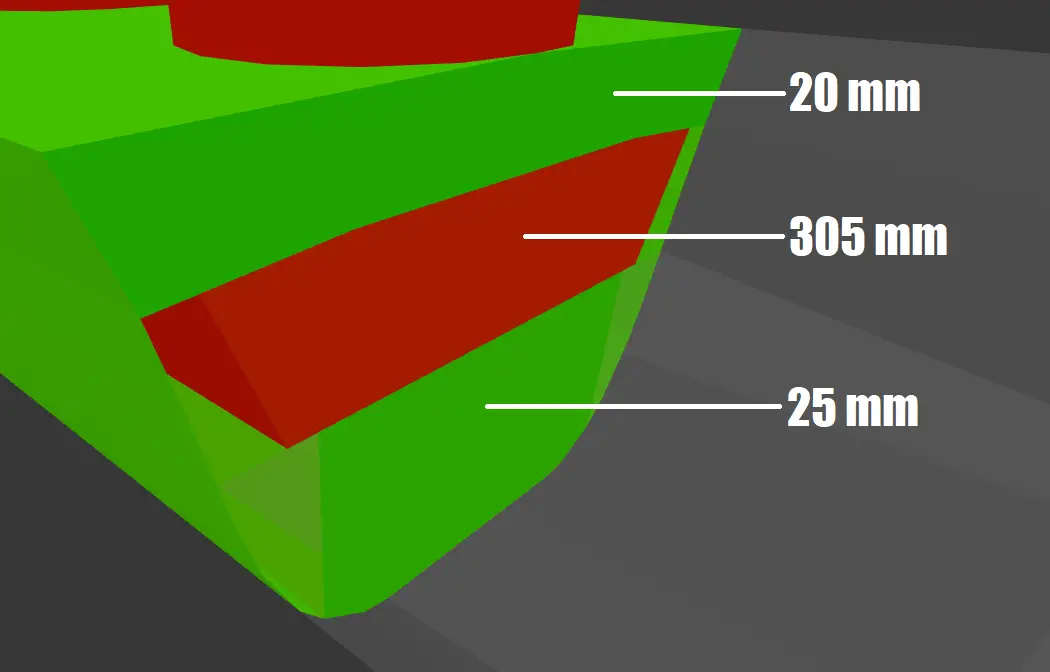
Citadel armor protection:
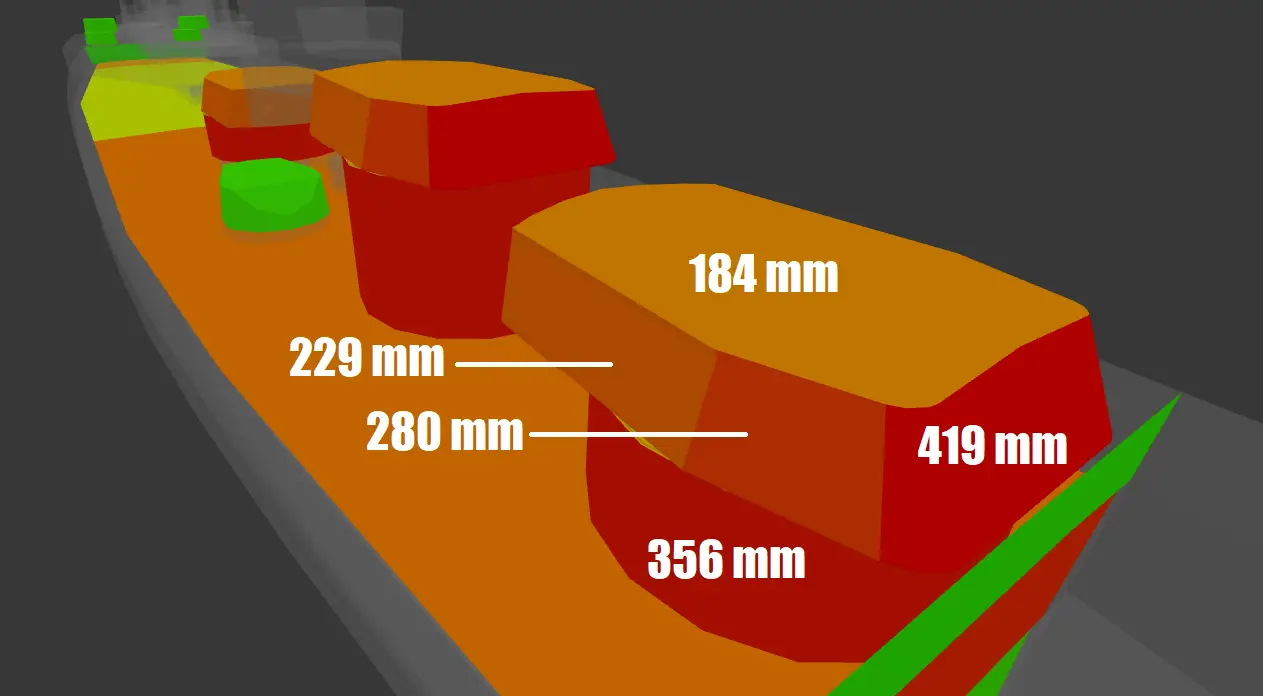
Turrets armor protection:
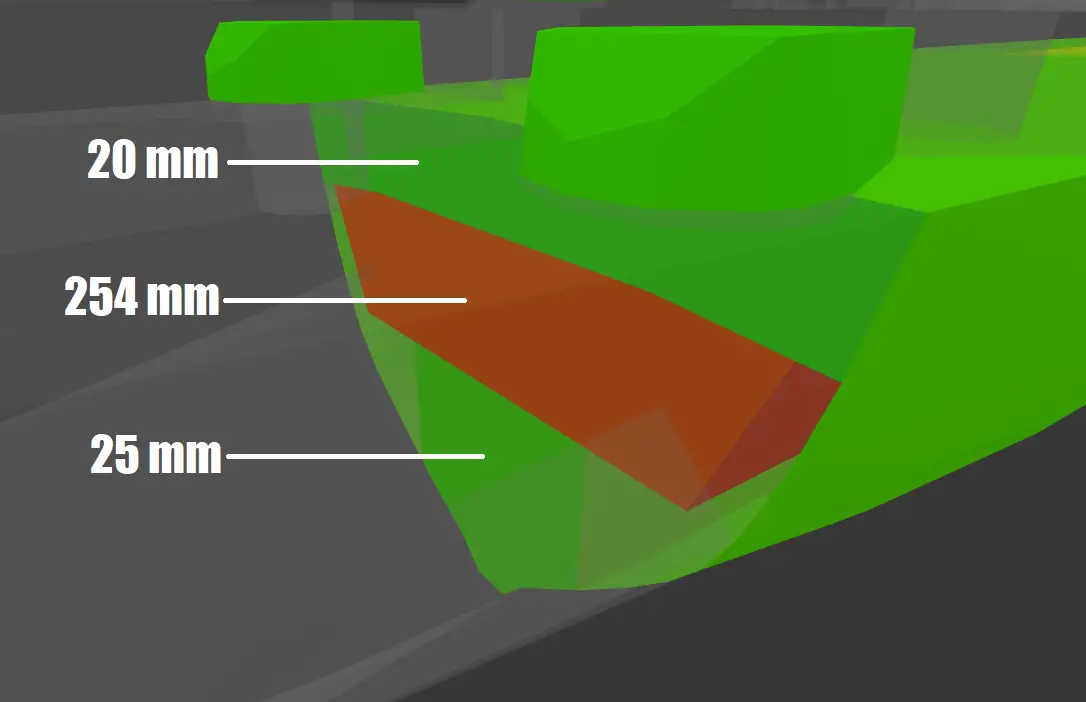
Hidden armor protection inside the bow and stern:
Personal Opinion
Overall, Duncan looks quite good but is far from being without flaws. In terms of main battery, there is definitely nothing to complain about as she gets the same AP as Lion with short-fuse and also the battlecruiser dispersion. The fact that she doesn’t get the thermo-nuclear HE is also particularly appreciable as the last thing we need is a line of Thunderer. The firing range is limited but at least the ship is fast and can close the distance easily thanks to the good concealment. She also gets great firing angles that will allow the ship to remain well angled and not exposed the squishy citadel.
Talking about the citadel, the armor on this ship will forgive absolutely nothing. The citadel sits well above the waterline and it’s particularly thin behind the 3rd turret. Also, the front and rear athwartships can easily be nailed by enemy battleships that can overmatch the 25 mm bow and stern.
Long story short, may it be angled or broadside, chances are that this ship will get clapped hard.
Thank you for reading this article!
Don’t hesitate to subscribe to our notifications to make sure that you don’t miss any future articles.
Also if you are new to the game or want to get back to it, feel free to use my Recruiting Station code for free goodies such as Premium ships, premium time, and more: https://warships.net/yuzorah
Have a good one and see you soon!